How to Build a Storage Cabinet with Swing-out Shelves and Sliding Doors
Tools and materials (affiliate links)
- 2-½ sheets of ¾” maple plywood
- ½ sheet of ½” maple plywood
- 13/16″ maple edge banding
- (4) 2″ butt hinges
- (4) ¾” diameter Finger pulls
- (4) ¼” diameter aluminum brass rods
- (24) Adjustable shelf pins
- 1-½” #8 flat head wood screws
- 1-¼” pocket screws
- 1-¾” flat head Tapcon screws*
*If mounting to cinder block walls; Otherwise use appropriate wall anchors (secure to studs).
- Table saw
- Track saw
- Router table or handheld router
- ½” straight router bit
- Hacksaw
- Drill/Driver
- Countersink bit with depth stop
- 90-degree corner clamp squares
- Pocket hole jig
- Shelf pin jig
- Forstner bits (¼” & ¾”)
- Edge banding trimmer tool
- J-roller (for edge banding)
- Level
- Hammer drill*
Get the plans (click image blow)
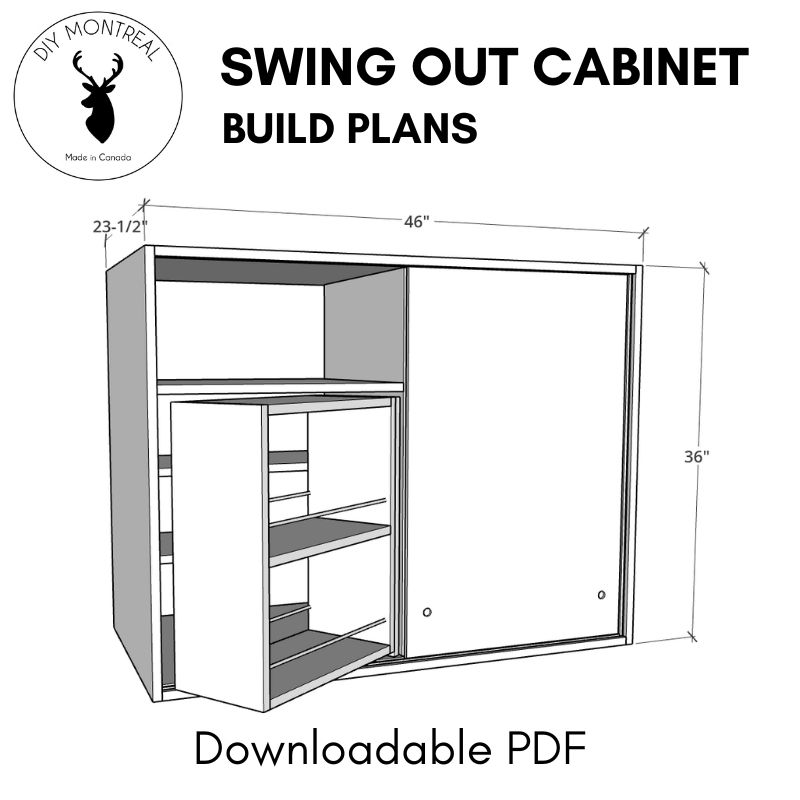
Building a Custom Shop Cabinet with Swing-out Shelves and Sliding Doors
Transforming garage space into an organized haven for tools can be challenging. I recently tackled this by designing and building a unique storage cabinet. This project was born from my need to relocate small power tools from the basement to the garage, maximizing storage with an extra-deep wall cabinet featuring sliding doors and swing-out shelves.
Step-by-Step Process:
1. Breaking Down Plywood: Using ¾ inch maple plywood, I started by having the large sheets cut in half at the store to fit in my SUV. Back in the shop, I used a track saw for initial cuts and a table saw for precise final cuts.
2. Cutting Sliding Door Tracks: I cut tracks into the top, bottom, and sides of the cabinet for the sliding doors using a router table. Ensuring the top track is deeper allows easy installation and removal of doors.
3. Applying Edge Banding: For a polished look, I edge banded all front-facing plywood edges using iron-on edge banding. This step is optional but gives a professional finish.
4. Adding Shelf Pin Holes: Using a jig, I added shelf pin holes for adjustable shelves. Ensuring accurate and consistent spacing is crucial for functionality.
5. Cabinet Assembly: Assembling the cabinet with screws, I used corner clamps to ensure everything was square. I opted for a French cleat system for wall mounting, ensuring a secure and level installation.
6. Installing Swing-Out Shelves: Building swing-out shelves with pocket screws and brass rods, I ensured they would support the weight of tools without sagging.
7. Creating Sliding Doors: Using ½ inch plywood, I crafted the sliding doors, opting for a thickness that balances durability and ease of use. Finger pulls were added for easy opening and closing.
Challenges and Adaptations:
Initially, my design included full-height swing-out shelves, but garage door tracks required a change to sliding doors. Despite the adjustments, the cabinet maximizes storage and accessibility, fitting perfectly above my router table.
Conclusion:
This project highlights the importance of adaptability in DIY woodworking. The result is a highly functional and organized storage solution that fits seamlessly into the garage space. For those interested in replicating this project, detailed plans and a list of tools used are available.
By following these steps and embracing flexibility, you can create custom storage solutions tailored to your space and needs.