The simplest jigs are always the best ones. Today I’ll show you how to make 5 super simple woodworking jigs that’ll make your life easier. No fuss, easy to make jigs that can be assembled in minutes using scrap wood.
How to cut thin strips on the table saw? Easiest way to hang a picture frame? Making straight cuts with a circular saw? How about safer cuts on the table saw? How to get the perfect sized dado? All these questions and more will be answered.
5 Super Simple Woodworking Jigs
Today I’m going to show you 5 basic jigs you can make in just a few minutes. Nothing fancy. Nothing complicated. The idea is to keep these as simplistic as possible but of course you can add all the bells and whistles you want to make these jigs even more awesome.
1. Thin Strip Cutting Jig
Dimensions:
3/4 plywood – 20″ x 3-1/2″ & 20″ x 2″
1×2 pine block roughly 5 inches long
1/4 plywood roughly 2″ x 5″
Cutting thin strips on the table saw can be nerve wracking and downright dangerous if you’re not careful. It becomes difficult to effectively push the stock past the blade and kickback can easily occur.
There are a few ways to make this type of cut safer, one being to use a push block. I’ll use this to cut half inch strips, but when I want to cut something as thin as one eight of an inch, I get a little nervous and often worry I’ll put the blade through the tool. The leg is replaceable, but it’s enough to startle someone which is never a good thing when using the table saw.
Another option is to use a physical reference like a Magswitch that you set to the outside of the blade. Once set up, you can batch out multiple strips of the same exact thickness. It’s a pretty practical tool. Once in position, just turn the knob to activate the magnet and it’s locked in place. I do like the safety of this method, but the drawback is that you constantly have to adjust your fence on every cut, which can be a bit finicky to get it just right.
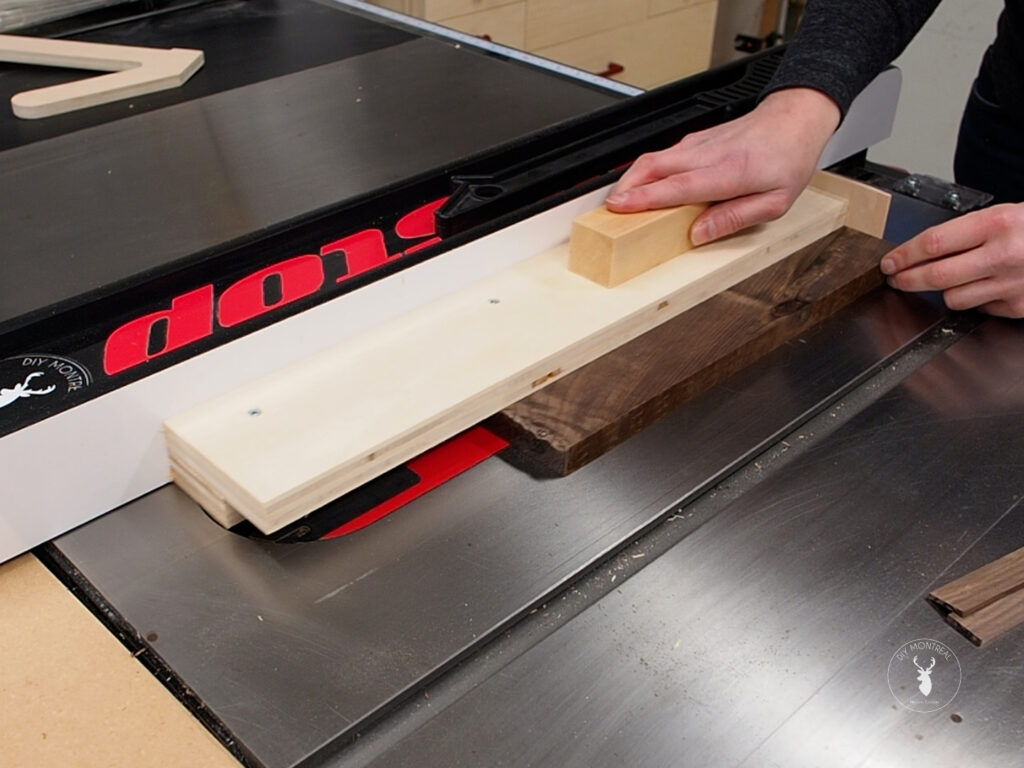
A third option is to build a simple jig. All you need is a strip of plywood, a block for the handle, and a thin strip for the heel. I’m keeping this jig super basic, nothing fancy. I’ll simply screw the wooden block that will act as a handle to the strip of plywood. I’ll first create a temporary bond to hold it in place using some CA glue and activator. I can then flip it over and screw it down after first drilling some pilot holes using a countersink bit.
For the heel, I have a random thin strip of wood I picked out of my scrap pile but you can use a thin piece of plywood instead. I’ll secure it to the back end making sure to offset it just a bit so it won’t interfere with the fence. Again, countersink hole first so I can then easily screw it in, flush with the bottom side of the jig. Notice that the heel extends past the jig to the left, which is what you want.
Okay so let’s try it out. I know that my plywood is exactly 3-½ inches wide, so I’ll set my fence to 3-½ PLUS one eighth of an inch because I want to cut one eight strips of wood. So now you can see I’ve got a narrow gap between the jig and the blade.
Note that I’m cutting fairly long strips so there’s no chance they’ll fall into the opening around the blade but if you’re cutting short strips you should seal it up with painter’s tape.
After a few passes, I could clearly see it works. I’m getting thin, even strips. But I’m still feeling a little bit nervous that I’ll experience some unexpected kickback, so I think I can make this jig a little safer.
I’ve got another strip of plywood here – same length but ripped to exactly 2-inches wide – and I’m going to add it underneath the jig. The key thing to point out here is that the piece I’m adding has to be the same thickness as the stock you want to cut.
Now I want this to be flush to the fence so I’ll flip it on its side and clamp it, then simply secure it with a few screws.
I’ll also replace the heel with a slightly bigger piece. Again, I just want it to cover the entire back side and extend past a few inches to the left.
Okay, let’s test it out. I’m making sure my blade isn’t too high, just the tips poking up above my workpiece. I’ll set the fence to 2-1/8 (2 inches is the width of the jig and 1/8 for the width of the strips I want to cut).
Wow, this feels much better. I feel safe and in control with the jig essentially covering the blade and the workpiece. Plus, I barely have to push through the workpiece with my other hand, just letting the heel and the jig do most of the work. I love it! Definitely a safe and easy way to batch out even thin strips.
2. Adjustable Dado Jig
Dimensions (3/4 plywood)
2 @ 24″ x 5″ >> Cut groove starting 1″ from each end, roughly 1/2″ wide and 1/4″ deep, then drill through center using 5/16 bit (to match size of T-bolts)
2 @ 11″ x 2-1/2″ >> Drill holes 2-1/2″ from each end on center using 5/16 bit
Dados can be super practical in so many applications. Typically if I wanted to make a dado, say for a bookcase, I’d draw a reference line, then grab a 3/4-inch straight bit and set it in my router. Then clamp a guide rail down and run the router against the guide. And voilà, we have a dado.
The problem you’ll often run into doing it this way is that the dado is the wrong size. Here you can see that the joint isn’t tight and there’s actually a noticeable gap you can see here. That’s definitely not what I want when making a dado.
The problem is that most 3/4-inch plywood isn’t actually 3/4 inches thick. They actually sell “undersized plywood bits” that are 23/32nds. This bit works great when your plywood is exactly 23/32nds, but that isn’t always the case.
So, today I’m going to build a pretty simple adjustable dado jig. I’ve seen all sorts of dado jigs but I’m going to try something a little different and I hope it works out.
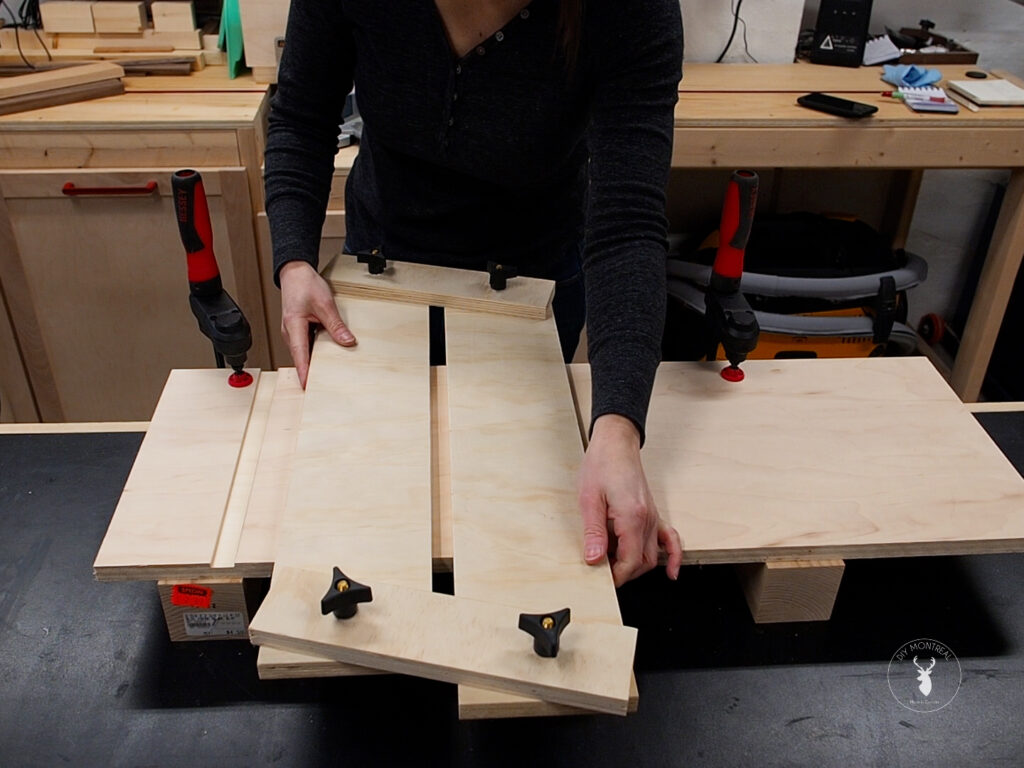
I’ll cut 4 strips (see dimensions above), then connect them using T-bolts and star knobs. But the first thing I want to do is create a track for the T-bolts so they don’t spin endlessly as I tighten the knobs. Here I’m measuring the width of the T-bolt but it doesn’t have to be a tight fit, it can have a little wiggle room, so I’ll go with about half an inch wide.
I’ll lower my blade to about a quarter inch and set a stop so I can make consistent grooves at each end of both of my pieces. I can then just nudge the board over to widen the groove progressively. I’ll stop about midway then adjust the stop to mark the opposite side of the groove for all my cuts. Then remove the stop and nudge over the board until the groove is complete.
Okay so my 4 grooves are cut and I can do a quick test to see that my T-bolt fits nicely – like I said, just a hair wider than the T-bolt so it fits effortlessly. Next, I’m going to drill some holes right in the center of the grooves to fit the T-bolt through. I’m using a 5/16 bit to match the size of the T-bolts. And I’ll drill holes in the smaller pieces using the same bit.
Okay, so that’s pretty much it. Now I can assemble it and it’s ready to use. Just slip the T-bolt into the tracks from underneath, then add the shorter piece of wood to connect both sides and add a washer and star knob to each bolt.
As you can see here, by moving the pieces, you can adjust the size of the slot in the middle depending on the size dado you need. The easiest way to set it up is to grab the piece you want to make a dado for and drop it in, then adjust the jig to its snug but not too tight, then tighten down the knobs.
Now just carry the jig over to your workpiece, line it up with your reference line, and clamp it down. Then drop in your router. You’ll need a half inch pattern bit with a top bearing so the bearing can ride along the jig. Lower the bit so it pokes out by about 1/8th and lock it down.
You want to go around in a clockwise direction, starting on one side then over to the next. I’ll then lower the bit and go around again. Ok, let’s test this out. I mean yep, perfectly snug without being too tight. So with jig there’s no more guesswork. You get the perfect dado every time.
3. Circular Saw Guide
Dimensions (3/4 or 1/2 plywood)
48″ x 10″
48″ x 2-1/2″
I’ll be honest: I don’t care much for circular saws and rarely use them. I find it challenging to line up the cut and get a straight clean cut. Not to mention actually cut on the line.
Instead you’ll see me using a track saw which is amazing for getting precise clean cuts in sheet goods. But a track saw can also be expensive and not in everyone’s budget, especially if you only use it on occasion.
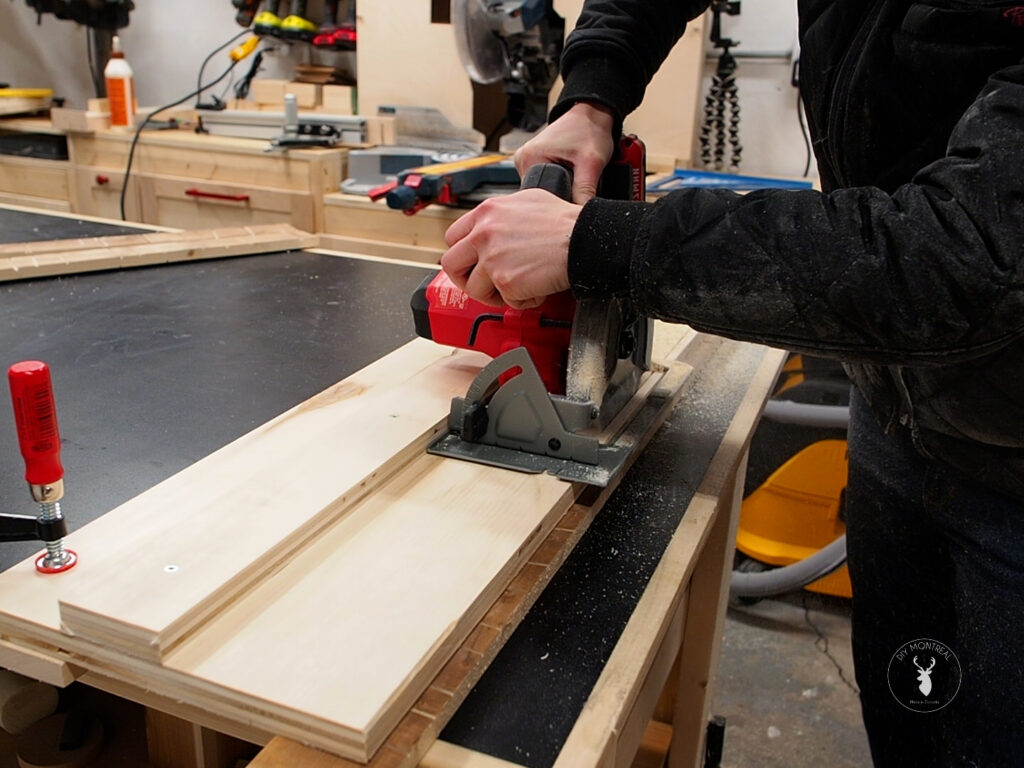
But the good news is that you can turn pretty much any circular saw into a track saw by making a super simple guide rail. You can make it any length you want according to your needs, but I find the 3 to 4 foot length to be ideal. You’ll want a strip roughly 10 inches wide and the other roughly 2 to 3 inches wide.
Next, grab your saw and flip it over to get a rough measurement of the distance between the edge of the base plate and the blade. It doesn’t have to be exact, but just a rough idea.
Then add a half inch or so to that measurement and mark that onto the bigger board. You want to make sure the reference edge here is the side the saw blade will be on, depending if your saw is blade-right or blade-left.
Add a little glue and clamp the other piece down right up against the line. Then grab some flat head screws and screw it down after first making some countersink pilot holes.
All that’s left now is to cut the edge to make a zero clearance edge which will really help you get clean and precise cuts. As you can see the jig is pretty simple. The key is to leave enough room on the opposite side of the base so you can clamp the track down without getting in the way of the motor. And as you can see, I have a little excess material on the blade side that I’ll trim away for the perfect zero clearance base.
To avoid tearout, set the jig on some scrap wood for this. Then set the height of the blade so the tip of the teeth are just poking down underneath. Then make the cut, making sure the base plate is pressed up against the fence throughout the entire cut.
And with that, the jig is ready to use, so let’s try it out. Remember to always support your cuts to prevent pinching of the blade. I’ll trace where I want to make the cut, then line up the edge of the track on the line, and clamp it down. Then just let the saw glide along the track keeping it snug against the fence. And voilà. A perfect clean, precise and perfectly square cut.
4. Vertical Cutting Jig for The Table Saw
Dimensions (3/4 plywood)
12″ x 10″
12″ x width of table saw’s fence
12″ x (height of table saw’s fence + 3/4″)
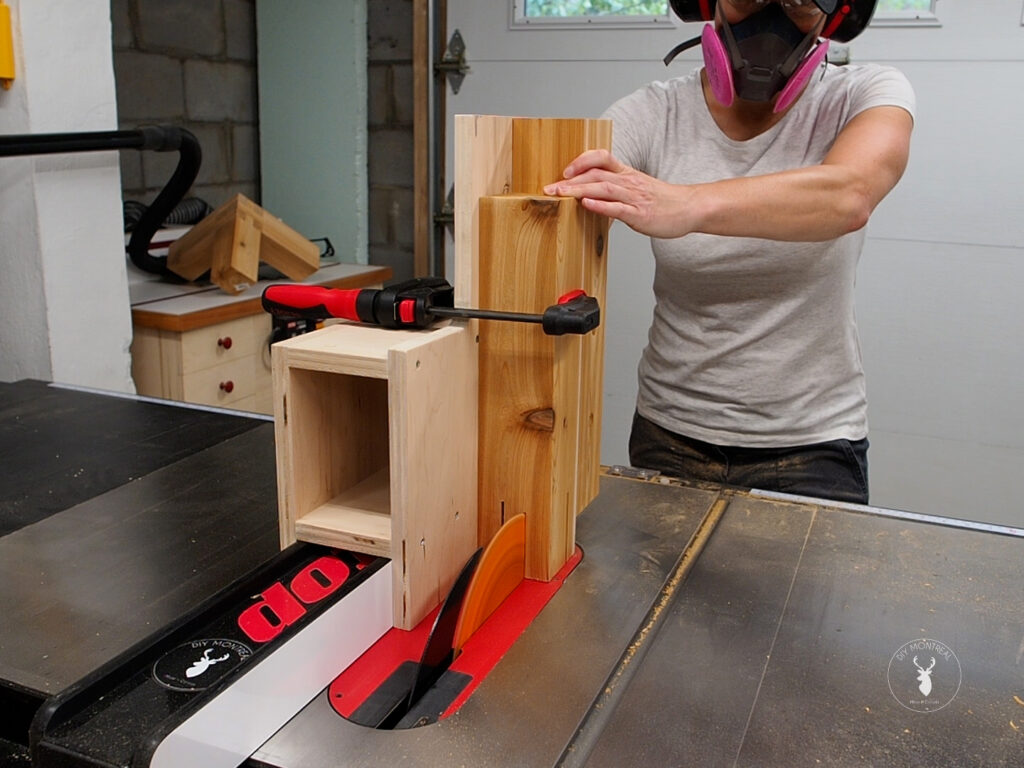
This next jig is super easy to make and oh-so-versatile. Some people call it a tenoning jig, but it can do more than that. You only need 3 pieces of plywood for this. The idea is to assemble a frame sort of like this that will ride along the table saw’s fence. It needs to be snug around the fence, so I’ll measure the width of the fence – mine’s about 4 inches – and rip this piece to size.
This outside piece doesn’t need to be this tall either, so I’ll trim it down a bit. There, that’s good. A quick check to see that it’s not too tight. Looking good. So here’s the basic structure of the jig. Next I’ll clamp it together so I can assemble it with some screws.
Ok, the last step is to add a vertical piece that will act as a backstop and support your workpiece as you push the jig through the blade. You want this piece to be perfectly square so I’ll use a speed square to position it, then clamp it down. I also recommend adding a handle of some sort; I just screwed on a block of wood.
Alright, slides smoothly. You can also add a coat of paste wax if needed to help it slide better along the fence.
So like I said, this vertical cutting jig can be used for cutting tenons, but if I’m honest I’ve never built anything using mortise and tenon. Still, there comes a time when you might need to make a notch in the end of a board, like when I made a flip top planer/sander cart. This is the perfect way to make that cut. It’s also great for cutting bridle joints, if you’re into that sort of thing.
Or say you want to cut an aggressive edge on a board, like if you’re making a pizza peel. Just tilt your blade, clamp your board vertically to the jig and run it through.
I built a similar jig for making castle joints for a coffee table. But I made it a lot taller and more robust to support the beefy 4×4 posts I was cutting. By adding a second horizontal support, it’s much more stable. You can also make a hole through the vertical face or cut away a portion like I did here to make it easier to clamp your piece in place. The beauty of these jigs is how easy they are to make so you can easily throw one together for whatever your needs may be.
5. Keyhole Slot Jig
Dimensions (1×2 pine or poplar)
2 @ 3-1/2″ (or width of router base plate)
3 @ 7-1/4″ (or width of router base plate + 2x width of the wood + 3/4″)
This is a keyhole router bit. It’s a super easy way to hang things flat against the wall. I used it for this wine rack I made and several picture frames too. But without some sort of jig, it can be tricky to use. Actually I’m not really sure how you would use this without a jig.
Anyhow, I’ll show you how to make a super simple jig in no time. First you’ll want to measure your router’s base plate. If it’s round, just measure the max width. The idea is then to build a box around the base with a little wiggle room on one side.
I’ll grab a strip of 1×2 pine from my lumber cart and cut 5 pieces. 2 @ 3-½ inches – which is the width of my router plate, and 3 @ 7-¼ inches – which is the width of my router plate, plus twice the width of my wood, plus ¾ inch of wiggle room.
Next I simply need to assemble the parts like so. You can use whatever method you want- I’m just going to screw it together but I’ll first drill pilot holes using a countersink bit to prevent splitting.
Then I’ll line up the edges and clamp it together so nothing will move while I drive in the screws.
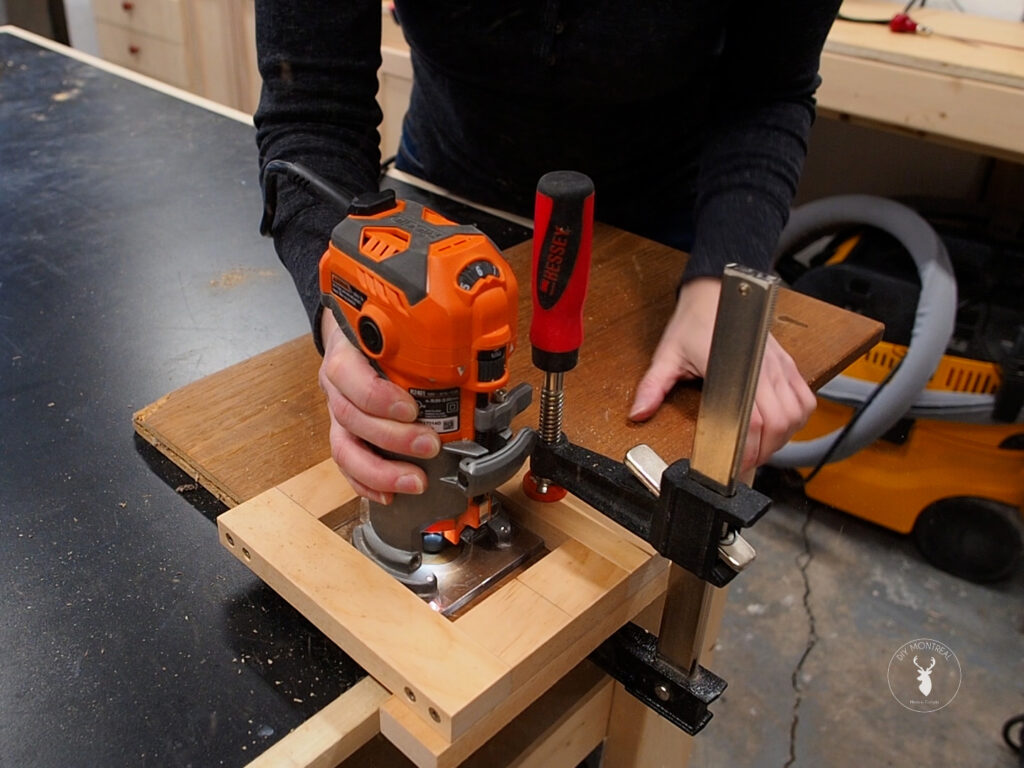
Voilà. A quick check to make sure the router actually fits – ok all good. Last step is to attach this piece that will act as a reference against the top edge of whatever you’re trying to make keyhole slots into. Just make sure it’s flush and secure it. I’m using nails for now so I can show you an alternative later, but you can screw it down too. I like to trace a center line at the top which will make it easier to use.
So let’s say I want to hang this plaque on the wall. I’ll measure and mark equally from both sides and draw a reference line then line up the jig and clamp it down.
Here’s a look at that bit again. I like to set the height to about half the thickness of the workpiece. That way it won’t blow through but it’ll have enough material left above the collar too.
Using the jig is simple. First fire up the router. Then place the router against the edge of the jig and slowly plunge the bit until the router bottoms out. Then push the router all the way up and back down again. Turn it off and wait until it comes to a full stop before pulling it out so you don’t cause any blowout.
And voilà, a perfect keyhole slot. The idea is to screw 2 round head screws into the wall. Push the holes over the screws, then press the plaque down to lock into place. It works really well!
Hey, I hope you learned something new and discovered a jig that could be useful in your shop.
